Getting Started with Google Code Hosting, Subversion, and TortoiseSVN without feeling like an Idiot
 I’ve been using Google’s open source project hosting to distribute my Tag Cloud Generator, but I haven’t been using the source code repository feature. They have a hard-to-find guide on getting started with the Subversion source control system, but the world needs something better. With screenshots. Plus I haven’t fed the blog recently.
You can find more information about Subversion and source control by reading a chapter of this book.
1.0 Prerequisites
Before we get started there are five things that you will need.- Google Account
- login used for all Google services like Gmail, Blogger, etc.
- Software Project
- hosted by Google Code
- You’ll have to be a member of the project to add/modify files (contact the administrator)
- TortoiseSVN
- Windows client for Subversion (9 MB)
- Requires a restart after installation
- It’s a shell integration and all commands are performed within Windows Explorer
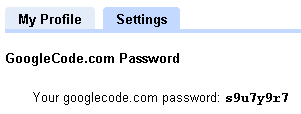
- GoogleCode.com Password
- Sign in to Project Hosting
- Go to Profile >> Settings
- Take note of your password
- Subversion URL of project hosted at Google Code
- Sign in to Project Hosting
- Go to Project >> Source
- Will be in the format of
https://<projectname>.googlecode.com/svn/trunk/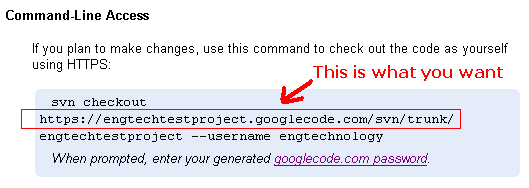
GOTCHA
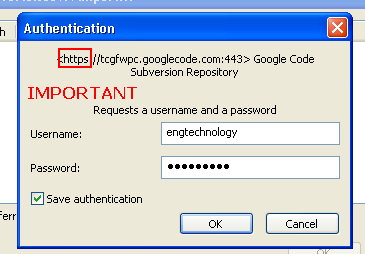
If you use http instead of https you will have authentication problems and waste 15 minutes trying to find out why your password doesn’t work. You could spend those 15 minutes doing something much more useful like not getting in trouble for ignoring your girlfriend.
2.0 Adding Files to an Empty Project
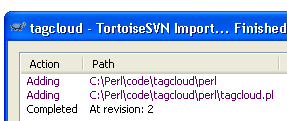
- Select the directory your source code is in, Right Click and choose TortoiseSVN >> Import
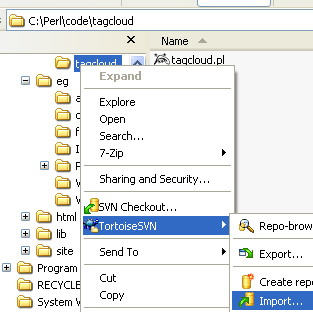
- Use the URL of the project
- Make sure it starts with https!!!
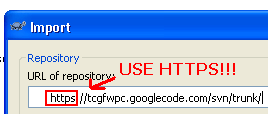
- Make sure it starts with https!!!
- Fill in your Google username and your Google Code password
- Wait for it to finish
3.0 Connecting to an Existing Project
- Select the directory you want to check out the source code to, Right Click and choose TortoiseSVN >> Checkout

- Use the URL of the project
- Make sure it starts with https!!!
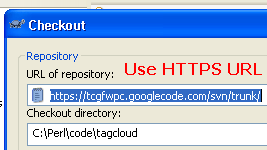
- Make sure it starts with https!!!
- You will not have to enter your username/password if you are already authenticated.
4.0 Getting Started with Editing Files
Right-click on the file/directory and then- SVN Update to get the latest changes
- SVN Commit to upload modified files
- TortoiseSVN >> Add to add new files to the project
How to use SVN with Google code
For a more updated version of this blog post go to my new Blog http://blog.m-zaher.com/2011/10/how-to-use-svn-with-google-code/
1. Download TortoiseSVNhttp://tortoisesvn.net/downloads
2. Installing TortoiseSVN and restart your computer.
3. To get your GoogleCode.com password go to:
http://code.google.com/hosting/settings

4.You should now see this new items below if you press right-click on any empty place in the explorer or on any folder

5. Create a New Folder to hold all your files that you will work on.
6. Right-click on this folder and choose “SVN Checkout…”.
7. In the “URL of repository:” Enter your project’s URL in this formate “https://[ProjectName].googlecode.com/svn/trunk” e.g.”https://test.googlecode.com/svn/trunk”

8. Press OK and Enter your Google username and your GoogleCode.com password - in this case “Bx7QS3by2rX9″ -

9. In the folder add a new text file “test.txt”
10. Right-click /TortoiseSVN /Add…
11. Select the files you want to upload to the SVN.

12. You should see this in case of a successful uploading.

13. Note the RED X meaning that this file isn’t up-to-date with the SVN.

14. Right-click on the text file and select “SVN Commit…” and enter any message you want to write.

15. This is what you should see after a successful commit.

16. Note the green check mark on the file meaning it is up-to-date with the SVN.

Notes
|

For a more updated version of this blog post go to my new Blog http://blog.m-zaher.com/2011/10/how-to-use-svn-with-google-code/
How To Access Google Code SubVersion(SVN) Server
This is a brief tutorial to access Google Code SVN Server. Google Code is very fast and reliable for SVN Repository.
I am using one of the sample project that have been done for NUS ISS M.Tech Course. ARS.Net is a simple program for Flight Reservation. Database structure and content are inspired from SAP sample of S_FLIGHT.Subversion (SVN) is a version control system initiated in 2000 by CollabNet Inc. It is used to maintain current and historical versions of files such as source code, web pages, and documentation.
Like other services from Google , Google Code required Google User name and password, with some notes:
- username = gmail username without @gmail.com
- password of Session = Login to Google services (e.g gmail) firstly to keep session in browser and next goto App. SVN url e.g http://code.google.com/p/arsnet
- SVN password = SVN Client will use this password to authorize user to access SVN Server.
SVN password can be found under Settings link , see picture below:

One of powerful and fast SVN Client is TortoiseSVN which can be downloaded on http://tortoisesvn.net/downloads.
Below is step by step to use SVN Server of Google Code. The End target is we can do a check out and check it of SVN.
1. Create Workspace Folder and Checkout SVN
Create a folder using Windows Explorer, right click and choose SVN Checkout…

TortoiseSVN will ask an url, type an Application Project svn from googlecode, e.g https://arsnet.googlecode.com/svn/trunk/. On checkout directory enter workspace location which created on Step 1 e.q: D:\workspaces\VisualStudio.Net\ARS.Net

2. Setting up Firewall Proxy (optional)
This step is optional, if there are any firewall existed, it is needed to define a proxy and port for TortoiseSVN to access internet


3. Checkout SVN and User Authentication
If TortoiseSVN is succeeded to connect to google code, It will required to key in user (w/o @gmail.com) and SVN password (see Step1 to retrieved a SVN password). Tick Save authentication checkbox so it will not keep asking user/password for every Checkout.

4. Add File or Folder to SVN
To add file or folder to SVN , on folder/file right click press TortoiseSVN – Add…

Select folder or file to be added

If it is success on add, it will show the result. but the concrete file is still not in SVN Server.

5. Commit Changes
Every operation on SVN Client such as Add or modify, SVN requires to commit to send a file to repository server.

It is a good practice to give an informative comments.

Commit is succesfully done.

With these few steps, you have done a basic use of SVN repository (standar operation that frequently done).
Accessing Google SVN from behind Proxy
For accessing SVN from behind firewall proxy, you need to know what is your proxy addess, port , user id and password. Usually this information can be found in your browser setting like IE is in menu Tools – Internet Options – Connections Tab – LAN Setting .
The way to add proxy setting, is right click on SVN folder and from context choose Tortoise SVN – Settings as seen below:

And from Tortoise SVN setting choose Network [1] and check the Enable Proxy Server[2], write down the information which you have in Browser proxy recently[3]. Some times a proxy is without user id or /password, then in this case just left it blank.

Clearing Authentication Cache.
This TortoiseSVN – Setting is to clear SVN user id/password after you authenticate it. It is very useful if one computer is used by more than 1 SVN user id. In Settings , choose Saved Data, click button Clear on Authentication data.
Using google's free SVN repository with Eclipse
Ok - here are some very quick notes on getting a google svn hosting account set up with eclipse; as google is offering us all such an amazing resource, I have a feeling I'll be doing this again some time whilst working on other projects...
If you already have a gmail account, make sure you're logged in (that way, your repository and your account will be linked).
Start here:
http://code.google.com/hosting/
Go to the 'Create a new Project' link and create your project...
Install eclipse if you haven't already (current recent version is 3.5):
http://www.eclipse.org/downloads/
Now you need to install the subclipse plugin from within eclipse..
Here are some step-by-step instructions:
http://subclipse.tigris.org/install.html
Once that's done you should be able to open your repository as a new project within eclipse.
Within the package explorer (the panel on the left if you're in the java developer perspective), right click to get the context menu and go to 'New' and 'Other...'
expand the SVN folder and select 'Checkout Projects from SVN' and select Next
Select the Create a new repository location and select Next
The URL will be:
https://[YOUR_PROJECT_NAME].googlecode.com/svn
If you don't use https:// you'll check out the repository as read only
Select (highlight) the folder to check out as an eclipse project (e.g. trunk) and select Next.
Select the check out as a project configured using the New Project Wizard and select 'Finish'
For this exercise, I'm checking mine out as a java project, so I'm selecting Java Project and Next on the wizard box.
Give the Project a name (e.g. myProject), select Finish and OK
Let it check out your project...
You should see something like myProject [trunk] in the package explorer.
You can now right click on the folder and go to New > Folder and create a new folder
When you're ready, right click on the folder you've created, go to the Team context menu and select 'Add to Version Control'; you'll probably need to do this for any new files you subsequently add...
From then, commit will add new changes and update will refresh a stale repository.
One other note: to check out the project, I used my gmail username. The svn password isn't the same as your gmail password though.
I found the password for the code repository (when logged in) here - so hopefully this will help:
http://code.google.com/hosting/settings
NB: I've seen situations where subclipse (or subversion) would keep asking for a password; I managed to stop it from doing this by going into the Eclipse > Window > Preferences, expanding the Team folder, selecting SVN and ensuring that the SVN interface was selection was set to SVNKit (Pure Java).
How to create Google Code project and synchronize files with SVN repository using Subclipse


Alperen Guclu
MobAPPing Team
Importing Subversion Repositories to Google Code
I recently added two of my pet projects to Google Code. I chose Google's Open Source hosting because they have a very clean UI with integrated issue tracking and also offer native support for Subversion. One of the many aspects that make Subversion a decent choice is the ability to import existing SVN repositories to Google Code. That is, the whole history is uploaded and your soon-to-be open source project doesn't loose valuable undo history. YAGNI? Maybe.
Importing a complete repository to Google Code is well documented, but what if your repository contains several projects and you just want to upload a certain one? Actually Subversion has all you need, there are just a couple of things to prepare. I will provide everything you need here, you may also want to use this excellent write-up (also look here) which I used as a reference. The syntax presented here works on Windows, whereas the author of the above articles was working on a *nix machine, so the command lines differ a bit.

Renumbering revisions and dropping empty revisions cleans up the resulting dump and prevents revisions with no changes.
Now that you have dump in place, create a new repository for Project-FooBar.
To make the import process succeed, you have to create the paths that are not included in the dump, i.e. all directories above the path that was included by svndumpfilter. In the our case, this is the /foo directory.
It's time to import the dump to the repository just created.
If you didn't create all necessary directories in the last step, you will receive an error message like this:
Your can now have a look at the new repository by pointing your browser to https://localhost:8443/svn/project-foobar-import/ where you only should see Project-FooBar.
The next step moves the project to the root of the repository and aligns the directory structure with Subversion's default directory layout.
All set. The last step is to upload your Subversion repository to Google Code using the documented command line below.
The whole import process will take a little bit, depending on the size of your repository. It took me about 40 minutes for a repository with about 100 revisions, time to grab a cup of coffee.
Of course you can script the whole process:
Use SVN to download Synergy & Other ROM Nightlies
Prime XL 3D (Sense 3.5)
Nuggy's Unlimited Evo3D (Sense 3.0)
Synergy Evo 3D (Sense 3.0):
InfectedROM Eternity (Sense 3.0)
Myn's WarmTwoPointThree (Sense 3.0)
Airborne 3D:
Code:
Kingdom 3D:
XRON 357 Six-Shooter
ROM Developers, if you'd like your ROM to be featured here for easy reference, please PM me your SVN checkout link.
New SVN Users, start reading from here!
As promised, I'm posting this graphical guide up for those who wish to use SVN in order to obtain nightly builds of ROMs and all other items that utilize SVN for distribution. As always, my guides are meant for the completely clueless, and come with screenshots for help
First of all. Let's start with the big question.
What is SVN, and why do I care?
SVN is actually not an acronym for anything. "SVN" is the command line phrase that triggers a system called "Subversion", but no one wants to type out Subversion every time they want to refer to svn :P. Long story short, it allows for simple distribution of computer software/ROMs/etc with methodical updating that can be rolled back at any time. It may sound intimidating, but I'll be making it quite easy for you to understand, and ultimately, you'll find it quite useful. Don't get intimidated or freaked out. A few days ago, I had never used SVN either, but now it's a piece of cake!
Well, uh, that sounds interesting, but seriously, why do I care?
Well, you should. Let's take our Sense-based ROMs, for instance. They're all roughly 300+ MB (maybe less for the Sense-stripped ROMs).
Doesn't it suck to have to download a new 300+MB zip file each time there's a small fix that you really want to get to?
What if I told you, that using SVN, you only have to download the select files that the ROM devs have updated, which tends to be a fraction of the size, rather than download a full massive zip of the ROM each time? That instead of downloading 300 MB, you'd only have to download 30 to get a bunch of fixes and updates? What if I also told you that you can revert changes which broke your previous setup with ease? Sounds good? Great! Let's get started!
Stuff You'll Be Needing
*What is this? An SVN checkout link is the link that your ROM dev or software author will provide you. It tells Tortoise SVN where to get all those yummy files. For the sake of our example, we will be using the Synergy ROM, which is developed using Google Code. Google Code provides automatic SVN links for those who know how to use it. Read on to understand more.
BOLDED Text - These are folder locations.
Red Underlined/Bolded Text - These are hyperlinks.
Blue Bolded Text - These are bonus tidbits that may or may not appeal to you.
Step 1: Install Tortoise SVN
Step 2: Create the proper folder structure
So then, you don't HAVE to do it this way, but this is how I do it, and will keep your organized.

Step 3: Start Downloading!
So let's start the downloading process, because this will take some time.
Part 1: Download


Remember, if you're not downloading Synergy, look at the top of this post for all recently updated SVN trunk links!


Congrats! We synced it properly. Now, here's the thing. Each one of those folders you see contain a hidden .svn folder, which Tortoise SVN uses to keep track of the version numbers whatnot. Therefore, if you zipped up all the files you see right now, you'd have a massive ZIP file full of unneeded files, and it might also malfunction/not flash on your device. This is where we use the "Export" command.
Part 2: Export, Zip, and Flash!


When that's all done? Take the zip, put it on your phone's SD card, and flash that thing. Enjoy!
But wait, Liquid, you said we could update without downloading each time!
Installing Svn plugin to Eclipse and Using Google’s SVN Code Repository With Eclipse
First off all install eclipse if you haven’t already (galileo is used in this tutorial):
(http://www.eclipse.org/downloads/)
Open Eclipse
Help –> Install New Software
Add http://download.eclipse.org/technology/subversive/0.7/update-site/ to “Work With” value and click add.

Insert a name value in popup page.
Check Subversive SVN Connectors box and click Next .

Restart your eclipse .
Click Window –>Open Perspective –> Other –> Svn Repository Exploring –>
Check SVN kid 1.1.7 in Install Connectors window.

Click Finish
After this a new window will be opened .

Click Next and Next again
Click Accept terms of the licence aggerements and Click Finish
Restart Your Eclipse
Your svn plugin installation is okey.
Now we will create a new project in google code repository.
Log in With Your gmail account and create a project.
You can use below link :
http://code.google.com/hosting/
We will created a project with name “samplesvnproject”
The svn url will be
The URL will be:
https://[YOUR_PROJECT_NAME].googlecode.com/svn
You can see your svn password in https://code.google.com/hosting/settings
In our demo our url is https://samplesvnproject.googlecode.com/svn
click Window –>Open Perspective –> Other –> Svn Repository Exploring
Click New –> Repository Location
Type url of your project for our demo https://samplesvnproject.googlecode.com/svn

For username type your gmail account which you created the project
Type your password in https://code.google.com/hosting/settings
Click Save Password .
Click Finish
Your repository is ready
Now you can create a new project and share your project to Google’s svn repository
If you already have a gmail account, make sure you're logged in (that way, your repository and your account will be linked).
Start here:
http://code.google.com/hosting/
Go to the 'Create a new Project' link and create your project...
Install eclipse if you haven't already (current recent version is 3.5):
http://www.eclipse.org/downloads/
Now you need to install the subclipse plugin from within eclipse..
Here are some step-by-step instructions:
http://subclipse.tigris.org/install.html
Once that's done you should be able to open your repository as a new project within eclipse.
Within the package explorer (the panel on the left if you're in the java developer perspective), right click to get the context menu and go to 'New' and 'Other...'
expand the SVN folder and select 'Checkout Projects from SVN' and select Next
Select the Create a new repository location and select Next
The URL will be:
https://[YOUR_PROJECT_NAME].googlecode.com/svn
If you don't use https:// you'll check out the repository as read only
Select (highlight) the folder to check out as an eclipse project (e.g. trunk) and select Next.
Select the check out as a project configured using the New Project Wizard and select 'Finish'
For this exercise, I'm checking mine out as a java project, so I'm selecting Java Project and Next on the wizard box.
Give the Project a name (e.g. myProject), select Finish and OK
Let it check out your project...
You should see something like myProject [trunk] in the package explorer.
You can now right click on the folder and go to New > Folder and create a new folder
When you're ready, right click on the folder you've created, go to the Team context menu and select 'Add to Version Control'; you'll probably need to do this for any new files you subsequently add...
From then, commit will add new changes and update will refresh a stale repository.
One other note: to check out the project, I used my gmail username. The svn password isn't the same as your gmail password though.
I found the password for the code repository (when logged in) here - so hopefully this will help:
http://code.google.com/hosting/settings
NB: I've seen situations where subclipse (or subversion) would keep asking for a password; I managed to stop it from doing this by going into the Eclipse > Window > Preferences, expanding the Team folder, selecting SVN and ensuring that the SVN interface was selection was set to SVNKit (Pure Java).
How to create Google Code project and synchronize files with SVN repository using Subclipse
This document is about creating a Google Code Project, uploading or updating your projects to Google Code Subversion (SVN) Repositories by using Subclipse plugin on Eclipse and downloading codes from Google Code.
Creating a new Project at Google Code:
Google Code offers free hosting services for open source projects.- To start creating a Google Code project, click this link: http://code.google.com/hosting/createProject
- Sign in your gmail account then the webpage shown below will be opened.
- Fill the Project Name, Project summary, Description, Version control system, Source code license, Project label(s) blanks with correct information. It is important to choose Version control system as Subversion (SVN).
- Then click Create Project Button. Now, your Google Code Project is ready to use.
- Newly created Project can be reached under My Favorites link at top left corner.
Installing Subclipse in Eclipse: (http://subclipse.tigris.org )
- Begin the installation from the Eclipse Help menu item. Click Install New Software.
- A new screen will be opened, click Add button.
- Fill the Name blank and enter the URL given below to Location blank, then click the OK button.
- At coming screen wait a few seconds and select Subclipse, click Next.
- Next screen shows items to be installed, click Next button.
- Read the Licenses, accept them and click Finish button.
- A security warning will be opened, click OK to continue installation.
- Finally, you should restart Eclipse for the installation changes to take effect. Click Restart Now button.
Using Subclipse on Eclipse for uploading Project to Google Code:
To upload a project or commit a change to Google Code, you need to be a member of the project. A project can be uploaded to Google Code as follows:- At bottom left corner of Eclipse, click Show view as a fast view button, and then click Other.
- Click SVN at new window. Select SVN Repositories, then click OK.
- SVN Repositories window will be opened right click then select New and click on Repository Location.
- At new window, for URL location we should write the address which is specified at your Google code Project under source tab.
- Open your Google code Project and copy the link which is underlined at below.
- Now turn back to Eclipse and paste the link to the URL location at Eclipse, then click Finish button.
- Now you are ready to check in your Project to Google Code. Right click on your Project at Eclipse select Team and click Share project.
- Select SVN at new window, then click Next.
- Select Use existing Repository location and click Next.
- Select Use Project name as folder name then click Finish.
- New window asks for password, now turn back to Google code page under source tab there is a link to create password.
- Click the underlined link, a password will be generated. Copy the password.
- Paste the password to password text area at Eclipse and enter your email address to username blank then click OK button.
- Perspective window will be opened click Yes or No according to your choice.
- Now a folder opened at your Google Code page for your Project. Newly created Project folder can be seen at Google Code page under Source tab. Click browse and project folder is located under svn/trunk.
- Now, Project files can be uploaded under created Project folder. At Eclipse right click on Project and select Team then click Commit.
- At new window, select files to upload (all files are selected automatically no need to change) then click OK.
- Now you will be asked for password, enter your google code password at explained before.
- Now you can see your project files at Google code.
Committing(Checking- in) your changes to SVN Repository (at Google Code):
- When you need to upload your updated Project to Google code, right click on your Project then select Team click Commit.
- Changes after last commit will be shown, click OK. Your Project at Google code page will be updated.
How to get last version on SVN Repositories (Update to Head):
- Updates your Project, located in your computer to latest version in Google Code. (Right click on project, select Team, click Update to Head)
How to get a specific version on SVN Repositories (Update to Version):
- Updates your Project located in your computer to selected version in Google Code. (Right click on project, select Team, click Update to Version)
How to Download (Check- out) a project to your computer from Google Code:
No need to be a member of the Google Code project to download it. Everyone can check it out as follows:- Add repository location to Eclipse as mentioned before.
- Right click on project name at SVN Repository page. Click Checkout.
- A new window will be opened, click Finish. Your project is saved to your workspace in your computer.
Alperen Guclu
MobAPPing Team
Importing Subversion Repositories to Google Code
I recently added two of my pet projects to Google Code. I chose Google's Open Source hosting because they have a very clean UI with integrated issue tracking and also offer native support for Subversion. One of the many aspects that make Subversion a decent choice is the ability to import existing SVN repositories to Google Code. That is, the whole history is uploaded and your soon-to-be open source project doesn't loose valuable undo history. YAGNI? Maybe.
Importing a complete repository to Google Code is well documented, but what if your repository contains several projects and you just want to upload a certain one? Actually Subversion has all you need, there are just a couple of things to prepare. I will provide everything you need here, you may also want to use this excellent write-up (also look here) which I used as a reference. The syntax presented here works on Windows, whereas the author of the above articles was working on a *nix machine, so the command lines differ a bit.
Create your Google Code project and reset the Subversion repository to revision 0
After you created the project on Google Code you can find the "Reset Subversion Repository" link at the bottom of the "Source" tab. Prepare your Subversion repository
You need local access to the Subversion server, a Remote Desktop or SSH connection would suffice. I'm assuming your repository is accessible over HTTPS on port 8443. Here are the paths used in the command lines below:| Property | Value |
|---|---|
| SVN repositories root | C:\Subversion\ |
| SVN repository containing the project | C:\Subversion\projects |
| Repository URL | https://localhost:8443/svn/projects/ |
| Project to import to Google Code | https://localhost:8443/svn/projects/foo/Project-FooBar/ |
| Google Code Subversion URL | https://project-foobar.googlecode.com/svn/ |
Dump your repository filtering the project path
First you need to dump the SVN repository containing the project in question. svnadmin dump saves the contents of the repository to the C:\Subversion\project-foobar.dump file on disk. To only take the parts into account we're interested in, use svndumpfilter to exclude everything outside the project path.Renumbering revisions and dropping empty revisions cleans up the resulting dump and prevents revisions with no changes.
svnadmin dump C:\Subversion\projects\ | svndumpfilter --drop-empty-revs --renumber-revs include /foo/Project-FooBar/ > C:\Subversion\project-foobar.dump

Including (and dropping empty revisions for) prefixes:
   'foo/Project-FooBar'

* Dumped revision 0.
Revision 0 committed as 0.
* Dumped revision 1.
Revision 1 skipped.
...
Create a new repository for the project
Now that you have dump in place, create a new repository for Project-FooBar.
svnadmin create C:\Subversion\project-foobar-import
Create directories needed to load the dump
To make the import process succeed, you have to create the paths that are not included in the dump, i.e. all directories above the path that was included by svndumpfilter. In the our case, this is the /foo directory.
svn mkdir https://localhost:8443/svn/project-foobar-import/foo/ -m "Folder created for import"

Committed revision 1.
Load the filtered dump
It's time to import the dump to the repository just created.
svnadmin load C:\Subversion\project-foobar-import < C:\Subversion\project-foobar.dump

<<< Started new transaction, based on original revision 1
     * adding path : foo/Project-FooBar ... done.
     * adding path : foo/Project-FooBar/trunk ... done.
...
If you didn't create all necessary directories in the last step, you will receive an error message like this:
<<< Started new transaction, based on original revision 1
     * adding path : foo/Project-FooBar ...svnadmin: File not found: transaction '1-1', path 'foo/Project-FooBar'
Move directories such that they follow the standard Subversion directory structure
Your can now have a look at the new repository by pointing your browser to https://localhost:8443/svn/project-foobar-import/ where you only should see Project-FooBar.
The next step moves the project to the root of the repository and aligns the directory structure with Subversion's default directory layout.
svn move https://localhost:8443/svn/project-foobar-import/foo/Project-FooBar/trunk/ https://localhost:8443/svn/project-foobar-import/trunk/ -m "Folder moved"
svn move https://localhost:8443/svn/project-foobar-import/foo/Project-FooBar/tags/ https://localhost:8443/svn/project-foobar-import/tags/ -m "Folder moved"
svn move https://localhost:8443/svn/project-foobar-import/foo/Project-FooBar/branches/ https://localhost:8443/svn/project-foobar-import/branches/ -m "Folder moved"
svn delete https://localhost:8443/svn/project-foobar-import/foo/Project-FooBar/ -m "Folder deleted"
Upload your Subversion repository to Google Code using svnsync
All set. The last step is to upload your Subversion repository to Google Code using the documented command line below.
svnsync init https://project-foobar.googlecode.com/svn/ https://localhost:8443/svn/project-foobar-import/
Copied properties for revision 0.

svnsync sync https://project-foobar.googlecode.com/svn/
Committed revision 1.
Copied properties for revision 1.
...
The whole import process will take a little bit, depending on the size of your repository. It took me about 40 minutes for a repository with about 100 revisions, time to grab a cup of coffee.
The script
Of course you can script the whole process:
@rem Create dump
svnadmin dump C:\Subversion\projects\ | svndumpfilter --drop-empty-revs --renumber-revs include /foo/Project-FooBar/ > C:\Subversion\project-foobar.dump

@rem Create repository for import
svnadmin create C:\Subversion\project-foobar-import

@rem Create directories needed for the import to succeed
svn mkdir https://localhost:8443/svn/project-foobar-import/foo/ -m "Folder created for import"

@rem Load dump
svnadmin load C:\Subversion\project-foobar-import < C:\Subversion\project-foobar.dump

@rem Move folders around
svn move https://localhost:8443/svn/project-foobar-import/foo/Project-FooBar/trunk/ https://localhost:8443/svn/project-foobar-import/trunk/ -m "Folder moved"
svn move https://localhost:8443/svn/project-foobar-import/foo/Project-FooBar/tags/ https://localhost:8443/svn/project-foobar-import/tags/ -m "Folder moved"
svn move https://localhost:8443/svn/project-foobar-import/foo/Project-FooBar/branches/ https://localhost:8443/svn/project-foobar-import/branches/ -m "Folder moved"

svn delete https://localhost:8443/svn/project-foobar-import/foo/Project-FooBar/ -m "Folder deleted"

@rem Sync with Google Code
svnsync init https://project-foobar.googlecode.com/svn/ https://localhost:8443/svn/project-foobar-import/
svnsync sync https://project-foobar.googlecode.com/svn/
Use SVN to download Synergy & Other ROM Nightlies
Ignore this quoted section if you are reading this guide for the first time. Start at the blue "New SVN Users" line.
List of SVN Checkout Links for ROMs that are developed with SVN:
Do NOT edit the URL in any way. Copy it exactly as it is shown.
List of SVN Checkout Links for ROMs that are developed with SVN:
Do NOT edit the URL in any way. Copy it exactly as it is shown.
Attention All Eternity/Airborne/Synergy SVN Users:
As of 11/29, Eternity and Synergy SVN access is restricted. Virus has stated his reasons here and here. Please do not ask him for a username or password, you will not get one.
To quickly check to see if he has lifted the restriction on SVN, all you have to do is to open the trunk links below in your browser. If it shows you a list of files, Virus has enabled it again. If it asks for a password, it's still locked down. It's much easier to check that way than to SVN Update every so often.
All other SVN Trunks are currently open.
Prime XL 3D (Sense 3.5)
Code:
http://warm-twopointthree-base-with-sense-three-dot-five.googlecode.com/svn/trunk
Code:
https://nuggys-unlimited-evo3d.googlecode.com/svn/trunk/
Code:
http://synergy-evo3d.googlecode.com/svn/trunk
Code:
http://infectedrom-eternity-3d.googlecode.com/svn/trunk/
Code:
http://warm-twopointthree-base.googlecode.com/svn/trunk
http://virusrom-airborne3d.googlecode.com/svn/trunk
Kingdom 3D:
Code:
http://synergy-kingdom-3d.googlecode.com/svn/trunk
Code:
http://xron-shooter-357.googlecode.com/svn/trunk/
New SVN Users, start reading from here!
As promised, I'm posting this graphical guide up for those who wish to use SVN in order to obtain nightly builds of ROMs and all other items that utilize SVN for distribution. As always, my guides are meant for the completely clueless, and come with screenshots for help
First of all. Let's start with the big question.
What is SVN, and why do I care?
SVN is actually not an acronym for anything. "SVN" is the command line phrase that triggers a system called "Subversion", but no one wants to type out Subversion every time they want to refer to svn :P. Long story short, it allows for simple distribution of computer software/ROMs/etc with methodical updating that can be rolled back at any time. It may sound intimidating, but I'll be making it quite easy for you to understand, and ultimately, you'll find it quite useful. Don't get intimidated or freaked out. A few days ago, I had never used SVN either, but now it's a piece of cake!
Well, uh, that sounds interesting, but seriously, why do I care?
Well, you should. Let's take our Sense-based ROMs, for instance. They're all roughly 300+ MB (maybe less for the Sense-stripped ROMs).
Doesn't it suck to have to download a new 300+MB zip file each time there's a small fix that you really want to get to?
What if I told you, that using SVN, you only have to download the select files that the ROM devs have updated, which tends to be a fraction of the size, rather than download a full massive zip of the ROM each time? That instead of downloading 300 MB, you'd only have to download 30 to get a bunch of fixes and updates? What if I also told you that you can revert changes which broke your previous setup with ease? Sounds good? Great! Let's get started!
Stuff You'll Be Needing
- Tortoise SVN (Free and Open Source)
- WinRAR (7zip will work just fine as well)
- A Windows PC (XP or higher)
- An SVN Link Checkout Link*
- A few minutes of time, and a relaxed mind

*What is this? An SVN checkout link is the link that your ROM dev or software author will provide you. It tells Tortoise SVN where to get all those yummy files. For the sake of our example, we will be using the Synergy ROM, which is developed using Google Code. Google Code provides automatic SVN links for those who know how to use it. Read on to understand more.
BOLDED Text - These are folder locations.
Red Underlined/Bolded Text - These are hyperlinks.
Blue Bolded Text - These are bonus tidbits that may or may not appeal to you.
Step 1: Install Tortoise SVN
- This is pretty straight-forward, simply download the correct installer for your PC (32 or 64).
Step 2: Create the proper folder structure
So then, you don't HAVE to do it this way, but this is how I do it, and will keep your organized.
- Start by making a folder called Evo 3D, anywhere on your computer. (I keep mine inside my My Documents Folder).
- Inside it, create two more folders. Because the ROM we are downloading for our example is Synergy, we will title it synergy-evo3d and the other one Current. You may change the title of the first folder accordingly based on what ROM you're downloading it. It doesn't matter what you call it, as long as you know what it is. In the screenshots of this post, all screenshots show the folder titled synergy-evo3d, so if you're downloading a different ROM, mentally replace that name with the name of your ROM in each screenshot
Step 3: Start Downloading!
- Now that we have our folders set up, let's be clear about which folder is for what. The synergy-evo3d folder is meant as your "cooking pot". You will update your ROM and revert your ROM from there, much in the same way you'd add more and more spices and ingredients to your cooking pot.
- Once you have updated or reverted the ROM, you then will export that updated content into your Current folder, which will end up being the zip you flash to your phone. If this doesn't make sense right now, fear not. I'll explain when we get to that step and why we do it this way.
So let's start the downloading process, because this will take some time.
Part 1: Download
- Right-click on the synergy-evo3d folder.
- Click on SVN Checkout. The following dialog will pop up.
- Now, we need the link of the repository. The developer of your ROM/software will provide this for you, you simply need to ask, or look below for a list of SVN Checkout links for SVN-based ROMs.
- If you are downloading Synergy ROM, we can find it at their Google Code site here. If you are NOT downloading Synergy ROM, please see the top of this post for the most recently updated list of trunk links.
- When you're on that page, select ONLY the shown part of the URL:
- We don't want the "svn checkout" part or the "synergy-evo3d-read-only" part. Also, we don't want the last "/" in the URL either.
Remember, if you're not downloading Synergy, look at the top of this post for all recently updated SVN trunk links!
- Paste the link of your ROM of choice back into our Tortoise SVN window, and press "OK".
- Now begins the downloading process. It will download the proper folder structure. Just sit back, and let it do it's thing. It can take anywhere from 5-10 minutes to an hour and a half, depending on your internet connection. If you have a slower connection, don't worry. Bite the bullet once with this, and then you'll see the beauty of SVN.
- Once it finishes, we're left with the completed folder! You'll notice there's now a green checkmark on it, signifying that it's our SVN folder and it has been properly synced:
- If we open this folder, we see the following:
Congrats! We synced it properly. Now, here's the thing. Each one of those folders you see contain a hidden .svn folder, which Tortoise SVN uses to keep track of the version numbers whatnot. Therefore, if you zipped up all the files you see right now, you'd have a massive ZIP file full of unneeded files, and it might also malfunction/not flash on your device. This is where we use the "Export" command.
Part 2: Export, Zip, and Flash!
- So, to ensure we don't copy any of the .svn folders that are unneeded for our ROM zip, we will use the Export command. This is where we will use the Current folder we created earlier.
- Start by right-clicking synergy-evo3d, go to Tortoise SVN, and find "Export".
- This dialog will pop up, asking you where to export. Navigate to our EVO 3D folder, and then click on our Current folder.
- Click OK. It will begin exporting:
- Once it is finished, it will create a synergy-evo3d folder inside the Current folder. If you see green checkmarks on any of these items, you're looking in the wrong location. You need to be looking at EVO 3D/Current/synergy-evo3d
- Open it up, and voila! There's our ROM package!
- BONUS: From this point on, you can customize the ROM before we zip it up. Stuff in the system/app folder you want to remove? Go on, get rid of it now! Or perhaps you want to add in your own Ringtones now? Do it
- Once you've made any personal changes you want (or none, if you want to just flash it as is), highlight all of the files, and click "Add to archive".
- This window appears. You've probably seen it before if you've ever zipped anything up.
- First and foremost, make sure you select the format to be "zip" and not the default "rar".
- Then, pick your level of compression. The idea is simple. if you go as simple as "Store", your file will zip up in seconds, but the finishing zip will be large (in my case, roughly 550MB). If you choose to take the "Best" compression level, it will takea few more minutes (depending on your computer) and can be as small as 330 MB. (That's of course approximate, different people may have different sizes depending on what they remove or don't remove).
- Finally, name it what you want, and click OK!
When that's all done? Take the zip, put it on your phone's SD card, and flash that thing.
Enjoy!But wait, Liquid, you said we could update without downloading each time!
- Yes, I did. That will be the next post, scroll down!
Installing Svn plugin to Eclipse and Using Google’s SVN Code Repository With Eclipse
First off all install eclipse if you haven’t already (galileo is used in this tutorial):
(http://www.eclipse.org/downloads/)
You can use below link :
We will created a project with name “samplesvnproject”